
1. Definition
Consider a scenario where we are going to build small Hospital Admission System in Dynamics 365. We divide this task into two posts.
2. Create Model
Before we start to create
a new model in Dynamics 365 for Operations (AX7), it is important to understand
what a model is. A model can be defined as a collection of elements that
represent a distributed software solution.

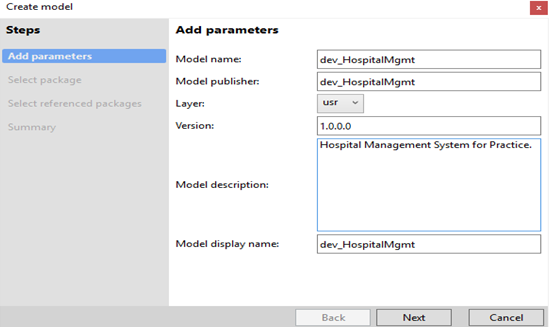
From the model wizard, you can specify the Model name, Model Publisher, Layer, Version, Model description, and Model display name.
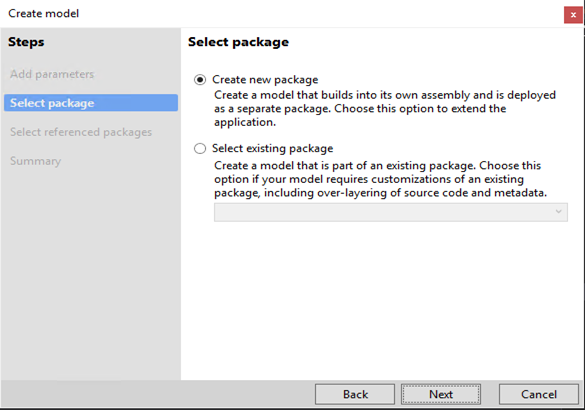
After clicking Next, you will need to determine if you want to Create new package, or Select existing package.


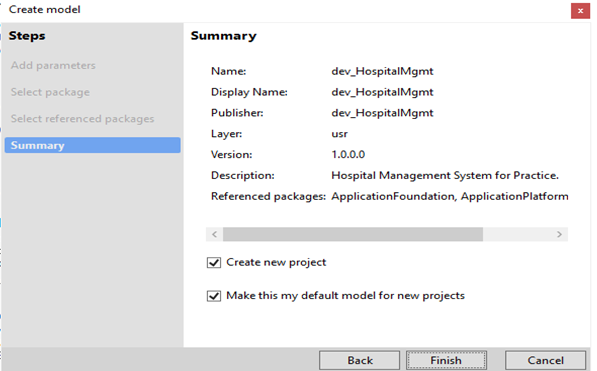
After hitting Ok, my new project (associated with my model) can be seen in the Solution Explorer window. From picture below, you may identify Project name, layer, and the Model name.

3. Define Database
Admissions Table
Consider a scenario where we are going to build small Hospital Admission System in Dynamics 365. We divide this task into two posts.
For
this post, we are cover following points to develop this small add-on
·
Create Model.
·
Patient, Diagnostic and admission table.
·
Simple list page for diagnostic table.
·
Entry form for Patient table (Detail form).
·
Parent Master detail form based on Patient, Diagnostic table and
patient.
·
List page for Patient table.
·
Integrate Patient List page with Patient Detail form.
2. Create Model
Before we start to create
a new model in Dynamics 365 for Operations (AX7), it is important to understand
what a model is. A model can be defined as a collection of elements that
represent a distributed software solution.
To create a new model, in Visual
Studio – from the menu, click on the Dynamics AX > Model Management >
Create model… This will open the model wizard.

From the model wizard, you can specify the Model name, Model Publisher, Layer, Version, Model description, and Model display name.
After clicking Next, you will need to determine if you want to Create new package, or Select existing package.
Next I am prompted to give a
name for the new project being created associated with my new model.

After hitting Ok, my new project (associated with my model) can be seen in the Solution Explorer window. From picture below, you may identify Project name, layer, and the Model name.

3. Define Database
So our table structure look like below.
Diagnostic
table
Column
|
Extended data Type
|
Primitive Data Type
|
DiagNo
|
DiagnosticNumber
|
Str20
|
Description
|
Description
|
|
Cost
|
AmountCur
|
Real
|
Patient
table
Column
|
Extended Data Type
|
|
PatNo
|
PatientNumber
|
Str 20
|
Fname
|
Name
|
|
LName
|
Name
|
|
BirthDate
|
BirthDate
|
|
Address
|
Str 60
|
|
City
|
Str60
|
|
State
|
Str60
|
|
Zip
|
Str20
|
|
Gender
|
T_Gender (Enum)
|
Admissions Table
Column
|
Extended Data Type
|
Primitive Data Type
|
Foreign Key
|
AdmitNo
|
AdmissionNumber
|
Str20
|
|
PatNo
|
Patient Number
|
Patient table
|
|
Diag_code
|
Diagnosticnumber
|
Diagnostic table
|
|
Admission date
|
FromDate
|
date
|
|
DischargeDate
|
ToDate
|
date
|
|
CoPay
|
Notes
|
Notes
|
3.1 Extended
datatype

First we create extended data type required in three tables. Please follow the below steps for creating the EDT’s.
Right click on your project name >> Add >> new Item >> Operations Artifacts >> Data Types >> EDT String and name it as DiagonisticNumber and set its string set its size to 20.
 Similarly
create all extended data types.
Similarly
create all extended data types.
3.2 Create Enum


4.
Create – Simple list form


5.
Create – Detail form


6.
Create list page


7.
Create Number sequences


8. Create common
class to generate the city code using number sequence


First we create extended data type required in three tables. Please follow the below steps for creating the EDT’s.
Right click on your project name >> Add >> new Item >> Operations Artifacts >> Data Types >> EDT String and name it as DiagonisticNumber and set its string set its size to 20.
3.2 Create Enum
In current
example only gender is enum type, we can create new Enum by Right click on your
project name >> Add >> new Item >> Operations Artifacts
>> Data Types >> Base Enum and name it as T_Gender and add two new elements
as Male and Female.
3.3 Create Table
To create table, Right click on your
project name >> Add >> new Item >> Operations Artifacts
>> Data Model >> Table and name it as DiagnosticTable.
Similarly create other required
tables.
4.
Create – Simple list form
Now we start development of form. First
form we will build for Simple list form for Diagnostic table. For this Right
click on your project name >> Add >> new Item >> Operations
Artifacts >> User Interface >> Form >> and name it as DiagnosticTable.
This will add new
form to the project. After add new datasource in the datasource node and set
the table property “DiagnosticTable”. Now the important thing is to apply
pattern to the design. It can be done by right clicking the design node of the
form and navigate to Apply pattern -> Simple List (As we are building Simple
list form so I have selected this pattern, choose patterns you like to add on
forms design).
After applying
the pattern, you can see it automatically gives you the pattern of design which
needs to be completed in order to build form design. Make sure there is no
missing control on the form design otherwise your project will not be build
successfully. New controls can be added by right clicking on design node, hover
to new and select appropriate control from the list. After that you can
see you form design layout in the below (pattern) panel.
For Simple List
form, we need to add following controls on it:
1. Action pane and
Action pane Tab
After adding action
pane and tab, we also need to add command buttons of ADD and DELETE same as we
do in earlier versions.
2. Custom Filter
Group
Custom Filter group
needs to be added on this form to filter the form data. One issue i faced while
adding custom group on design is that we also need to apply sub Patterns on it
otherwise it won’t work. Patterns can be applied in same way as we did on
design node.
After
that click on the design|Pattern and
over New and select the Action Pane from the list.
After that select the added group (FromGroupControls1) and right
click on it over apply pattern and
select custom and quick filters.
form also need
some data source, so we will drag and drop the table created earlier on form
data source. Now drag and Fields from the Data Source to form Grid. Now run
this form and check.
If you try to
enter duplicate values in Diagnostic number field. Due to unique index on
Diagnostic number it did not let you do it.
New create a
display menu with Name “MnuDiagonisticTable” and set it object Type to form and
object Name as “DiagonisticTable”. Save it.
Now set its
Properties display as below.
Now expand
Diagonaistictable right click on it and set its “FormRef” property with
mnuDiagonisticsTable.
5.
Create – Detail form
Now we create a detail from for
patient table. For this Right click on your project name >> Add >>
new Item >> Operations Artifacts >> User Interface >> Form
>> and name it as PatientTable and add two data source and set its Name
and Data Source value to Patienttable and AdmissionsTable accordingly.
Now set both data
source properties as “InsertIfEmpty” and “InsertAtEnd” to No and set
AdmissionsTable data source property as “Join DataSource” to PatientTable and
Link Type to Delayed. Now the important thing is to apply pattern to the
design. It can be done by right clicking the design node of the form and
navigate to Apply pattern -> Customs.
Now add TAB control to the design by
right clicking on it and set its name property as MainTab and Style as FaseTab.
Now add two TAB page controls to Main Tab
(TAB Control). Set first tab page properties as below.
Name: OverviewTab
Panel Style: DetailsHeader
Data Source: PatientTable
Caption: General
And set second tab page property a
below.
Name: DiagnosticTab
Panel Style: Grid
Data Source: AdmissionsTable
Caption: Diagnostic Information
Now add group control to the
OverViewTab (1st tab page) display as below.
Set group property Name as
OvewViewGroup, Data source as PatientTable and Data group as OverView. After
that you may see the screen as below.
Similarly follow the same process for
DiagnosticTab.After adding all required controls to DiagnosticTab you may see
the screen like below.
Now add group control to the design
pattern and set its property name as HeaderInfo and style to
DetailTitleContainer. After we need to add string control to the HeaderInfo
group control and set its name property as HeaderTitle and style as TitleField.
Now add button group control to DiagnosticTab
control to add and delete the records of Diagnostic.
Rename both the button controls
properties as follow.
Create Button:
Name: Create
Text: Create
Button Display: Imageonly
Command: New
Delete Button:
Name: Delete
Text: Delete
Button Display: Imageonly
Command: DeleteRecord
Now it’s time to check the output of
developed form, to run this form we need to set Project properties as below. By
right clicking on Project >> Properties.
Now set startup object type value as
Form and Startup Object value as PatientTable.Now bt pressing F5 key you may
see the out of the screen like below.
Now create Display Menu Item controls
for Patient table and rename its object to PatientTable value display as below.
6.
Create list page
Now we will create
a List page for Patient and attached Patient detail form with it.
For list page
template we cannot attach table in data source for this we can create a Query
Object. This Query Object will use as data Source in Form.
First we have to
create a Query. For this Right click on your project name >> Add >>
new Item >> Operations Artifacts >> Data Model >>
Query>> and name it as PatientQuery.
After saving you will find all fields
in Query.
Now we create a List page for Patient,
to do this right click on your project name >> Add >> new Item
>> Operations Artifacts >> User Interface >> Form >>
and name it as PatientListPage.
Now Drag and drop
the PatientQuery to the data source. This query we created in previous step.
Next important thing is to apply pattern to the design. It can be done by right
clicking the design node of the form and navigate to Apply pattern ->Simple
List Page.
Now add 3 controls to the Design Pattern.
Action pane, Group and grid. Please don’t forget to add Quick Filter and
Pattern to group control. Also set Show Delete button and Show New Button
property value to “No” to design pattern. Then add Grid data source table
property to PatientTable and drag and drop all required fields to grid display
as below.
Now add Button group to action pane
control. To do this right click on action pane >> button group.
Now add two menu item button controls
to button group control for add and edit Patient records and rename its
property as below.
Create menu Item Button:
Name: btnCreate
Text: New
Open Mode: New
Menu Item Name: MnuPatientTable
Big: Yes
Copy Caller Query: Yes
Edit Menu Item Button:
Name: btnEdit
Text: Edit
Open Mode: Edit
Menu Item Name: MnuPatientTable
Big: Yes
Copy Caller Query: Yes
Needs Records: Yes
7.
Create Number sequences
Now it’s time to
create number sequence to generate Patient Code. Before creating number
sequence, I hope you have some basic idea about Number sequence in AX. If you
have not, I will give you some small description as below.
Number sequences
in D365 are used to generate readable, unique identifiers for master data
records and transaction records that require them. A master data or transaction
record that requires an identifier is referred to as a reference. Before you
can create new records for a reference, you must set up a number sequence and
associate it with the reference.
We can create new
number sequence from below menu path.
Organization administration >>
Number Sequences >> Number Sequences.
Now click on number sequence button as
display below.
Now set Number sequence code as
“Patient” and name as “Patient Code for Patient Master form”.
8. Create common
class to generate the city code using number sequence
Now create common class to generate
the patient code using number sequence on create button click. Create new class
and rename its name as “dev_GenerateNumberSeq” as display below.
Create one method inside this class to
generate next number sequence and write a code to generate the next number
sequence.
Public str 60
GenerateNextNumberSeq(str 60
_Code)
{
str 100
strNumberSequenceName;
if(_Code!="")
{
strNumberSequenceName=numberSeq::newGetNumFromCode(_Code).num();
}
return strNumberSequenceName;
}
Now we have to call this class’s
method into PatientTable table’s “initValue” method so whenever new record in patient
master table is created, new number sequence for patient code is generated. So
first set PatientTable table’s filed “PatNo” to read only.
Now write below code in the said
method of PatientTable.
public void initValue()
{
dev_GenerateNumberSeq objdev_GenerateNumberSeq=
new dev_GenerateNumberSeq();
this.PatNo=objdev_GenerateNumberSeq.GenerateNextNumberSeq("Patient");
if(this.PatNo=="")
{
warning("Patient Code number sequence not found.");
}
else
{
super();
}
}
Now write the code in the PatientTable
form’s AddmissionTable data source.
public void write()
{
if(PatientTable.PatNo=="")
{
warning("Patient Code not found.");
}
else
{
AdmissionsTable.PatNo=PatientTable.PatNo;
super();
}
}


5 comments
Write commentsThank you so much sir,Because of you i learnt 45days course in 1 week.it's really a great article.
ReplyGreat and very good stuff
ReplyWhere is the second post?
ReplyThanks for sharing this informative article on Form Development in MS Dynamics 365 for Finance and Operations. If you have any requirement to Hire MS Dynamics CRM consultant to accelerate your company's success by evaluating new solutions and customizing existing ones with Microsoft Dynamics. Please contact us.
ReplyYour blog provided us with valuable information to work with. Each & every tips of your post are awesome. Thanks a lot for sharing. Keep blogging, quickbooks core payroll
ReplyEmoticonEmoticon